You've sold your home! Congratulations. Now the buyer has scheduled an inspection. What can you, as the seller do to make the inspection go smoothly?
1. Don't be there. This may seem obvious, but often sellers just can't seem to pull themselves away from the inspection process. It makes for an uncomfortable situation for all involved, so don't do it. You've worked hard on the house, but it's a house and all houses have things wrong with them. The inspector is being paid by the buyers to point out flaws, so there is no way you'll enjoy hearing this. I often have to call buyers to have a private conversation with them because I couldn't when I was at the house. This does not play well in the scenario of their comfort; many times they believe the seller is trying to "hide" something from them. Prepare the house as best you can and let things take their course.
I'll follow this post up with more things to make the inspection go smoothly.
Saturday, October 5, 2013
Thursday, September 19, 2013
Galvanized Pipes Rusting From Within.


Depending on access, this sort of problem can be solved relatively easy with PVC piping and rubber couplings.
Monday, April 22, 2013
Mold in Your Home
I'll go deeper into this subject, but a quick word about mold in the home. First, understand that mold is everywhere; under leaves in your yard, your car is a rolling mold factory, think about all that water that sloshes around your foot wells all winter long. If you've got mold issues, you'll know it in a pretty big way, and some people do have serious allergies to mold- for them, the topic is very, very serious, but this is just a quick overview post.
If you think you've got a mold problem in your house, the only way to know is to have testing done. Know that there are no "licensed" mold testers. Testers get some training, typically from the company that provides the lab work for their tests and into the field they go. This doesn't mean they're scam artists, but they're not scientists either. That said, a lot of folks know the value of fear of mold and exploit it to their advantage. This is more common among testing/inspection companies that mitigate mold, as they reap the real dollars from the results of the tests.
Just know that only a lab can truly identify mold, there are no gadgets that can be used in the field. A good inspector can probably know with a lot of certainty they're looking at mold, but they will always call for a test.
Wednesday, April 17, 2013
Refrigerator and Room Air Conditioner Recycling by First Energy
I always like to post information regarding offers from the utilities for appliance hauling etc. I just received a notice in my electric bill that First Energy has an offer to pick up older refrigerators and room air conditioners and as a bonus offer you up to $50 for recycling them. If you've ever had to get rid of an appliance like this when you weren't purchasing a new one you know how difficult this can be. These offers are usually for a limited time.
There are some limits on size, quantity per household etc, so make sure that this offer will work for you by visiting energysaveohio.com or calling for a pickup at 1 877-545-4112.
There are some limits on size, quantity per household etc, so make sure that this offer will work for you by visiting energysaveohio.com or calling for a pickup at 1 877-545-4112.
Wednesday, March 27, 2013
Caulking
Caulking. Not too exciting stuff, but it does an important job. It's something that nobody pays too much attention too though. Caulking goes on when paint work is done on wood siding, new vinyl or aluminum siding was installed, and also when window and door work is done. Then everybody forgets about it.
Over time, and that amount of time depends on the brand and quality of caulking used, like everything else it fails. Cracks develop, at it's worst it dries up and will fall off in chunks. Time to recaulk.

If you don't already have one, go to your local paint store and get a 5 in one tool. You'll be amazed by what a great item this is to have in your tool box. Helps clean paint rollers, opens cans, and that little pointed part is what you can use to remove caulk.

With caulk guns, the nicer ones are easier to use than the $3 specials. A good caulk gun will last a lifetime.

Dig and scrape out the old caulk and then you're ready for new. Pretty simple stuff, but there are a couple more things to keep in mind. Don't caulk the bottom of siding, trim etc. If water can get in, it needs to get out. I see lots of rotted wood because people caulked all the way around something. The other thing to keep in mind is to not caulk storm window drain holes shut. These are typically two small holes that allow water to drain off the window sill. The sill is pitched outwards for a reason, don't seal these up or you'll be replacing your window sills sometime in the upcoming years. Below is a picture of what I'm talking about.

With caulk guns, the nicer ones are easier to use than the $3 specials. A good caulk gun will last a lifetime.
Dig and scrape out the old caulk and then you're ready for new. Pretty simple stuff, but there are a couple more things to keep in mind. Don't caulk the bottom of siding, trim etc. If water can get in, it needs to get out. I see lots of rotted wood because people caulked all the way around something. The other thing to keep in mind is to not caulk storm window drain holes shut. These are typically two small holes that allow water to drain off the window sill. The sill is pitched outwards for a reason, don't seal these up or you'll be replacing your window sills sometime in the upcoming years. Below is a picture of what I'm talking about.
Lastly, you've got to develop your caulking technique. Practice a bit on some newspaper of an old board. The correct way to caulk is to push the caulk with the caulking gun; this gets more caulk into the crack. Pros can do it without ever touching it, I admit I'm guilty of using a finger on it more often than I'd like to admit. If you do need to correct a mistake etc, just keep some water and wet towels handy. A wet finger and a towel to wipe it off on are great things to have handy when caulking, and your clothes will thank you for not wiping it off on them; it won't come off once it's in the fabric.
So when the snow finally stops and spring is really here in NE Ohio, get out there and have a look at your caulking.
So when the snow finally stops and spring is really here in NE Ohio, get out there and have a look at your caulking.
Sunday, March 24, 2013
Springtime gutter cleaning
Spring is here and it's a good tome to check those gutters once again. Spring in North East Ohio means rain, so those gutters are going to be working hard over the next two months. Make sure they're free of debris, leaves, bark etc. that builds up over winter. Also make sure they're secure to the house. Winter freezing can loosen and pull out gutter spikes. Stand back and look at the gutters to make sure they're pitched correctly; you want your gutters pitched slightly towards the downspouts.
When it does rain, have a look to see what's going on. Are they over flowing? This puts a lot of water against your foundation, which can translate to a damp basement. If they are overflowing, is it just because of blockage or is it improper pitch? You may need a contractor to correct an improper pitch, if they're low enough, you can clean them yourself, but be careful on the ladder.
Lastly, have a look at the downspouts. If your's go directly into the ground, your gutters are tied into the storm sewers. When it's raining hard, make sure that they're not overflowing at the drain crocks. Also check to see that if you have the old vitrified clay type drain crocks that they're not damaged; they often break into several pieces at ground level, which of course defeats the purpose of draining all that water away from your foundation.
If you have surface draining downspouts, the type that have 90 degree bends near ground level and then discharge the water on the surface of the ground, verify that there is an extension in place. You want to divert that water away from the foundation, so you'll want a 18" minimum extension. Sometimes there is a splash block, a short of diverter that is placed on the ground so the water doesn't erode the soil. If your downspout extensions are crushed, replace them, these can get stepped on during gardening etc. if they're crushed, they can't do their job.
Sunday, February 3, 2013
Ice Dams and Attic Ventilation Pt. 2
So here's my follow up on my post on ice dams and some corrective measures. First of all, correcting what is causing the ice dam should be your primary concern. If your house is of recent vintage, you're probably going to find it rather easy to correct. Modern houses (20-30 years old) typically have large overhanging soffits. Sometimes the house was set up correctly for ventilation and insulation was installed in a manner that blocked the free flow of air into the attic from the soffits.
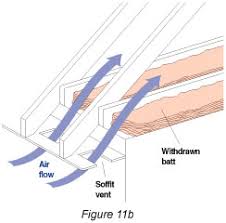
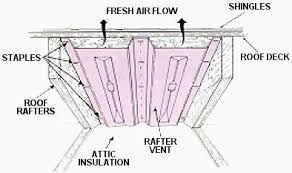 In the diagram above, you can see how the intake air enters. It then rises to the roof vents; ridge vents, gable vents or the standard old metal "static" vents and out of the attic. Sometimes overzealous homeowners or insulation contractors block the flow. To correct this, vent baffles are available.
These foam vents help to keep the insulation from pushing against the underside of the roof sheathing and blocking the air flow. But......
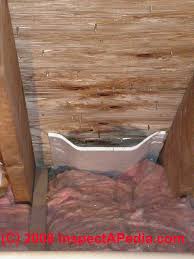
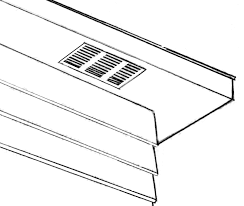
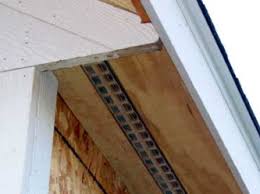
Yo must verify that the soffits have vents in them in the first place. A newer house will most likely have vinyl soffit venting installed, but you never know what's behind it. In a wood house, you can simply look at the wood soffits and see if there are vent. Another way is to go in the attic and turn off the lights. If there are vents you'll see some light coming from the soffits; the more the better. If there is no light and no visual evidence of soffit vents on the exterior, then you'll probably need to install some. See below for a few photos of soffit vents.
 There are some houses that are extremely difficult to ventilate due to design. There is always a solution, it may not be perfect and it may not be easy to find a contractor who knows how to do it. I'll talk about the more difficult vernting solutions in the next blog.
These foam vents help to keep the insulation from pushing against the underside of the roof sheathing and blocking the air flow. But......
Yo must verify that the soffits have vents in them in the first place. A newer house will most likely have vinyl soffit venting installed, but you never know what's behind it. In a wood house, you can simply look at the wood soffits and see if there are vent. Another way is to go in the attic and turn off the lights. If there are vents you'll see some light coming from the soffits; the more the better. If there is no light and no visual evidence of soffit vents on the exterior, then you'll probably need to install some. See below for a few photos of soffit vents.
Friday, February 1, 2013
A classic photo of the dreaded ice dam
I had the opportunity to take a photo of a textbook case of ice damming the other day.
 So you've got big icicles, and if things are really bad, water is entering the interior near the ceiling. This is why. When the temperature hovers around freezing, during the day the attic warms and melts the snow on the roof. It travels as water to the eaves, where it re-freezes. As the cycle is repeated, it eventually builds an "ice dam".
What happens next is that water is trapped behind it and backs up under the shingles causing the leaks. Leaking may enter the soffit and run down the exterior wall, and in the worst case scenario, the inside of the house.
How to fix it? Ice guard can be used when a new roof is installed. It's a rubber membrane that is placed at the lower edges of the roof instead of the familiar tar or felt paper. It seals around nails and typically is folded over the fascia board, so if water backs up under the shingles, it simply travels over the top of the ice guard to the gutter/fascia.
The other way is to keep the roof cold through proper venting. The colder the roof/attic space, it becomes less likely that heat will melt the snow.
More on corrective action and some of the problems that are encountered when doing them in my next blog.
Friday, January 18, 2013
Careful With Those Water Lines!
In keeping with the exterior faucet/Winter theme, you can never get enough warnings about keeping pipes from freezing.
As a home inspector, I often see plumbing in places where I worry about what will happen on those super cold nights, the ones where the mercury dips below 0 for several nights in a row.
Even if you live in a new house with frost proof faucets installed on the exterior, sometimes there are areas or rooms where temperatures can dip dangerously close to freezing. Lots of new construction has laundry sinks in the garage, make sure those garage doors are closed at night and if this is your first winter in your new house, you may want to put a thermometer in the garage and check on it during those hard freeze nights.
A more common pipe freezing problem is when renovations place pipes in unheated areas. A typical example is when a kitchen remodel moves the sink lines to the outside walls etc. In a lot of older ranches and bungalows circa 40s and 50s there are little "bump outs" or soffits that overhang free space. These locations are very susceptible to freezing pipes, if plumbing is installed.
Use common sense and caution this winter. Keep an eye on those pipes, open cabinet doors beneath sinks when to circulate warm air if needed. Heated pipe wrapping is also available if you identify a pipe that may freeze. An ounce of protection ahead of the trouble can save thousands in flood damage.
Monday, January 14, 2013
Frost proof faucets
As we dip back into more seasonal temperatures overnight here in NE Ohio, I thought I'd talk about frost proof faucets.
There are basically two types of faucets used on the exterior of homes, although this information would also apply to faucets installed inside attached garages. The first is the old standard, seen on houses since they started putting exterior faucets in.

The rubber valve that stops the flow of water is right at the faucet. If you were to take this one off the house, it would consist of the greenish portion only; there would still be a small portion of pipe sticking out of the house. Why is this not good in colder climates? When you shut the water off, water is present in that portion of the pipe that sticks out and is subject to freezing. Freezing water expands and bursts pipes.
The solution, is to put the valve that stops the water flowing deep inside the house where the temperatures are warmer. This type of valve looks like this:
.jpg) This works relatively well, but of course isn't completely infallible. Under the right conditions, even these can freeze, so it's a good idea to use common sense with water in areas of the country where you experience freezing temperatures. I routinely tell clients during home inspections to be mindful of keeping garage doors closed during hard freezes, the kind of nights where it's single on negative digits. Also, make sure your faucet is well sealed to the house with caulking etc. And putting one of these in at an unheated crawlspace is also asking more of it than it was designed to do. Remember, the copper pipe portion of the valve in the photo above must extend into a heated space.
This works relatively well, but of course isn't completely infallible. Under the right conditions, even these can freeze, so it's a good idea to use common sense with water in areas of the country where you experience freezing temperatures. I routinely tell clients during home inspections to be mindful of keeping garage doors closed during hard freezes, the kind of nights where it's single on negative digits. Also, make sure your faucet is well sealed to the house with caulking etc. And putting one of these in at an unheated crawlspace is also asking more of it than it was designed to do. Remember, the copper pipe portion of the valve in the photo above must extend into a heated space.
There's lots more info out there on these if you want to read more. They're a great device that allows you to hook up the hose on those warmer winter days without having to head into the basement and turn the water back on and then bleed the line again when finished. You also don't have to remember to turn these off. Just remember that it does still have water back at that inner end, and if it's cold enough, it can still freeze depending on where on your house this is installed.
There are basically two types of faucets used on the exterior of homes, although this information would also apply to faucets installed inside attached garages. The first is the old standard, seen on houses since they started putting exterior faucets in.
The rubber valve that stops the flow of water is right at the faucet. If you were to take this one off the house, it would consist of the greenish portion only; there would still be a small portion of pipe sticking out of the house. Why is this not good in colder climates? When you shut the water off, water is present in that portion of the pipe that sticks out and is subject to freezing. Freezing water expands and bursts pipes.
The solution, is to put the valve that stops the water flowing deep inside the house where the temperatures are warmer. This type of valve looks like this:
There's lots more info out there on these if you want to read more. They're a great device that allows you to hook up the hose on those warmer winter days without having to head into the basement and turn the water back on and then bleed the line again when finished. You also don't have to remember to turn these off. Just remember that it does still have water back at that inner end, and if it's cold enough, it can still freeze depending on where on your house this is installed.
Wednesday, January 9, 2013
New Construction Inspections PT 2
As home inspectors, we sometimes get asked to inspect new condos. The other day I inspected a condo for a client who was to close in four days. Workers were still in the unit trying to finish things up. There was a long, long list of items I found that required completion. Some were items that you might expect, missing hardware on kitchen cabinets etc. but many were not.
One of the things a home inspector can really help with on a new construction inspection is verifying all is in order. Buying a house or condo keeps you pretty busy, and by hiring a home inspector for a few hundred dollars they can do a methodical inspection of all the supposedly perfect things in your new house.
The example from the other day was a condo in Ohio City. If your house was built in the winter, you can bet the furnace was installed to help dry the drywall work. Unfortunately you can also bet that no filters were installed in your furnace, and that as the drywall was sanded and the house was swept (over and over) that your furnace saw the brunt of this. We often find brand new furnaces caked with construction dirt. The ductwork will also be subject to this. Who checks the ductwork on a brand new house? The home inspector does.
In this instance, due to the economy, this condo project, which was new construction within the walls of 100 year old building had seen a very long delay between start and finish of the units. The furnace, air conditioner and hot water tank, besides being filthy, were all almost 6 years old when I inspected them. Questions are raised in this situation: will the warranties be honored? If not, perhaps the builder can purchase a warranty on these mechanicals.
The bottom line is that inspections on new construction can save you problems and money, just as they can on older homes. My advice is don't skimp on an inspection under any circumstances.
Tuesday, January 8, 2013
Inspections For New Construction
I thought I'd take a moment to talk about the importance of inspections for new construction. Most people think "it's a new house, the builder gave me a warranty, why have a home inspection?"
The reality is you probably do still need a home inspection. I've done more than a few inspections where problems were of such magnitude that the buyers chose not to purchase the home. I'll give a few examples.
This past summer, during the height of the drought I inspected a development home built by one of the areas major builders. The home wasn't brand new, having been lived in about one year prior to the owners being transferred. Things got interesting in the finished basement. The lower half of the drywall had been replaced, and the recently installed carpeting had been removed. These are clear indications of water damage.
Of course the sellers had nothing about any of this in the disclosure. There was a sump pump installed which was not working. As I told the potential buyers that the sump needed replacement and re-installed the cover, the sump began to run. And run. And run. It pumped water from the basin for the next 30 minutes or so. I finished my basement inspection and it was still running.
I had not seen water in that amount draining that long in a sump. It was like fire hoses were filling the basin. Clearly something was amiss. I delayed my departure a bit to see if it would eventually cease and it didn't. The buyer realtor called the seller agent to let them know something was not as it should be.
I contacted several colleagues about this and all agreed that there might be water table issues in the area or that the sump was discharging at the exterior and coming right back in. Two days later, when the Radon tester arrived to pick up the Radon monitor, he called me to confirm that after two full days, the pump was still running. I suggested the buyers do some old fashioned detective work and talk to neighbors in the development. Sure enough, stories of flooding and failing sump pumps (these things weren't made to run that much) from both sides.
Figuring out exactly what caused this would take some diagnostics by qualified contractors. The buyers, who thought a one year old house would be worry free decided to buy another house.
Tomorrow, I'll post an inspection story about a brand new townhouse/apartment.
Subscribe to:
Posts (Atom)
