Friday, December 16, 2011

Why your smoke alarm may NOT save your family.

Why your smoke alarms may NOT save your family.
That really gets your attention, doesn’t it?  I know I wrote about this recently, but I thought I'd repost some info and add some links.   I recently had the opportunity to hear a presentation by Skip Walker, a fellow American Society of Home Inspectors certified inspector.   His topic, as well as a passion of his is educating the public about smoke detectors.  I know what you’re thinking- “we have smoke detectors, we’re not fools”.   But were you aware that there are two very different types of smoke detectors? 
I knew there were two types, but I have to admit, I was a bit uneducated regarding how they operated and the differences between them.   I’ll let the organizations do the talking.  At the least, you’ll learn which type is best under certain conditions.   
And of course, any smoke detector is better than none.  
Below is a link to info from the The World Fire Safety Foundation.  They are an Australian based non-profit group who firmly believe that photo-electric is the only way to go. 

Thursday, December 15, 2011

More programs offered through First Energy

Here is another energy related tip for this winter.

First Energy has a new program in which you’ll receive a professionally-installed programmable thermostat.    You must have central air conditioning to qualify, more details are available at www.energysaveOhio.com.  Other programs offered by First Energy can be viewed at the same website, such as the energy audits which I mentioned in previous blogs.

Sometimes you'll get notice in your bill about these programs.  It's a good idea to look around your providers website from time to time, as a lot of great programs aren't widely publicized.

Monday, November 14, 2011

Appliance Rebates from First Energy

Here's a great offer by First Energy.  They are offering rebates for Energy Star qualified appliance upgrades.

They are offering to pick up old refrigerators and offer a $50 rebate towards a new qualified appliance.  Add an old window air conditioner to it and get another $25 rebate.

The best part of this is that they will pick up the old appliances.  During home purchases, a lot of items can get left behind- you think you may want that old meat refrigerator in the garage, or maybe they just left it and weren't supposed to.  Either way, you no longer want it.  Unless you buy a new one from an appliance retailer that offers free disposal of the old one, you're looking as paying a fair amount to have these items hauled.  Take advantage of this program while it lasts.

For a pickup, call 1 877 545-4112 or visit www.energysaveOhio.com.

Tuesday, November 8, 2011

Smoke Detectors- Photo Electric vs Ionization.

As we enter the heating season, and as we’ve just had our clocks adjusted back for fall, I thought it would be a good time to talk about fire safety, particularly the differences between photo-electric and ionization smoke alarms.  The information below is taken from the NFPA (National Fire Protection Agency) website. 

The two most commonly recognized smoke detection technologies are ionization smoke detection and photoelectric smoke detection.
  • Ionization smoke detection is generally more responsive to flaming fires.
    How they work: Ionization-type smoke alarms have a small amount of radioactive material between two electrically charged plates, which ionizes the air and causes current to flow between the plates. When smoke enters the chamber, it disrupts the flow of ions, thus reducing the flow of current and activating the alarm.
  • Photoelectric smoke detection is generally more responsive to fires that begin with a long period of smoldering (called “smoldering fires”).
    How they work: Photoelectric-type alarms aim a light source into a sensing chamber at an angle away from the sensor. Smoke enters the chamber, reflecting light onto the light sensor; triggering the alarm.
For each type of smoke alarm, the advantage it provides may be critical to life safety in some fire situations. Home fatal fires, day or night, include a large number of smoldering fires and a large number of flaming fires. You can not predict the type of fire you may have in your home or when it will occur. Any smoke alarm technology, to be acceptable, must perform acceptably for both types of fires in order to provide early warning of fire at all times of the day or night and whether you are asleep or awake.
The best evidence has always indicated that either type of smoke alarm will provide sufficient time for escape for most people for most fires of either smoldering or flaming type. However, research is ongoing, and standards are living documents. If at any time, research points to a different conclusion, then that will lead to proposals for changes in the NFPA standard or the closely related Underwriters Laboratories standard for testing and approving smoke alarms. Both organizations currently have task groups looking at smoke alarm performance in the current home environment.
For best protection, use both types of smoke alarm technologies
For best protection, it is recommended both (ionization and photoelectric) technologies be in homes. In addition to individual ionization and photoelectric alarms, combination alarms that include both technologies in a single device are available.

Monday, November 7, 2011

Energy Audits

As the weather turns in North East Ohio, we start thinking about heating, and how much heat we're wasting.  The aisles at the Home Depots and Lowes bulge with pink insulation products.  Have you ever considered an energy audit?

First Energy is offering energy audits for customers this Fall.  On my most recent visit to their website at http://energysaveohio-home.com/residential-energy-audit/ these audits were offered for $100.  I know during the summer, they were offered free.  They may be free of charge based on income, so carefully explore their website regarding cost.

An audit will ultimately save you money, even at $100.  Sometimes we just need to be reminded about the basics, other times our houses are deficient in ways we weren't aware of.

Thursday, November 3, 2011

Wet Basements Part Four

After you carefully examine possible causes for your wet basement and eliminated the more simple causes, you may be facing some more serious costs to cure your problem.

A typical exterior foundation waterproofing job can cost $100 to $125 per foot of exterior, depending on depth and other factors.  When this work is done, shrubs will need to be removed and the basement walls will be excavated to the footers, walls sealed, and a new, modern drainage system installed.  These jobs rarely fail to cure the problem.  As I mentioned earlier, some situations may still exist due to type of construction, ie. the floor has no plastic under it, and some damp may rise up etc.

I would strongly recommend exterior digging to any of the interior based drain systems.  One very large Ohio company that leads the industry in North East Ohio has been known to use strong pressure sales, and if at first the contract is not signed, the price starts dropping from week to week.  Bottom line, look up any company via the Better Business Bureau website, and do some simple Google searches on them.  You can also make an inquiry with your local building dept.  They can offer a lot of help in some instances.  Each dept. policy is different and each inspector is different, but most are quite helpful.

As this is a big ticket decision ranging from five thousand for one wall to prices well into the tens of thousands, you might want to hire a home inspector to assist you with deciding what to do.  I recommend ASHI certified inspectors (American Society of Home Inspectors) as they have no interest in obtaining further work from you- they are your advocate only.  They may charge $150 or so for a consultation, but it is cheap insurance that you're choosing the type of corrective measure you need and not one a salesman wants to sell you.

I'll continue to post on this topic as it is a major problem that is also a major cost to homeowners in our area.

This photo shows a membrane being sprayed on a foundation wall.  The new drainage pipes will be placed in the bottom of the trench, then gravel will be backfilled to within a foot or so of grade.  The photo illustrates the complicated digging- close to the foundation and deep.  This is the reason for the high cost of exterior waterproofing.  

Leafguards for gutters


As we finish the Fall season, it seems like a good time to discuss gutter, or leaf guards.  These can be either a blessing or a curse, depending on your particular situation. 
The Cadillac of systems if the gutter helmet, permanent gutter type.  These aren’t really a screen at all, but a solid aluminum top piece that allows rain to roll over the top of the gutter and drip into the gutter below.  Leaves won’t make the trip into the gutters, but some pine needles can.  I have these on my house and have never had to clean them.  They are, by far, the most expensive option, costing several times more than traditional gutters.  In some heavy rains, some water may spill right over the top to miss the gutter.  These also require professional installation, as they are part of the gutter itself.
The other types of leaf guards cost much less than the Gutter Helmet system, and if you can get to your gutter, you can even install them yourself.  Most of them come in three foot sections.  These types all basically slip up under the shingles and snap into the gutters top edge (more or less, they don’t always fit perfectly- I recommend buying one piece to see how it fits your gutter before stocking up).  These have a mesh that will keep leaves out.  My father installed this type years ago and we’ve never had to clean the gutters, and we’re talking about 25 years!  He did a bit of special installation work by using some small wires to tie each section together to prevent any sagging between the three foot sections.  
There are also some that have a very fine screen instead of the grid.  These seem to become clogged with simple dirt buildup, so I’m not a fan of them, but some people say they’ve tried the more open grid type and found that they let in fine pine needles.  With either of these, ice may build up more quickly on them than a gutter with no guards.  I have no scientific evidence supporting this, it’s just something I’ve thought. 
The last type is one that is made up of metal mesh.  This comes on a roll, and is difficult to install and difficult to maintain as when they get bent into the gutter, you have to return it to it’s intended shape.  Ice, animals etc can all damage it.
In closing, you’ll have to decide on which type will work best for you , your trees, and your budget.  Remember to try some small sections to see how easy they install.  You may want to even try a particular area of your gutters to see how many leaves they keep out. 

 The “helmet” type.  Expensive and requires professional installation, but works well in most situations.

Plastic type, available at home centers.  There are also metal types similar to this.  Another type is similar to this, but has a very fine screen (you can’t even see thru it). 

 This mesh type can clog easily.  It's made of a ridge vent material.  I've seen these clogged many times during home inspections.

Friday, October 14, 2011

Wet Basements Part Three

So, the basements wet, what to do?   There are several "fixes" to this problem.  As noted in he earlier blogs, repairs can be largely dependent on the type of construction used for your home.  For simplicity, we'll explore a typical, 1950's ranch type home.  These fixes apply to some degree to many older homes as well.

Step one is examining exactly what is causing the wet basement.  This past summer in NE Ohio, we had record rainfall in just a few hours.  Lots of storm sewers filled up to capacity, and they backed up into basements.  This problem is out under the street and there's not too much that the individual can do, as it's related to the sizing of the city storm sewers.

If you've got the more typical seepage from walls etc, start with a walk around the house.  Are all the gutters clean?  Are the downspouts connected, clear, and draining into crocks leading to storm sewers or extending to a lower area on your property?  In the city, most homes will have the downspouts tied in to the storm sewers.  Sometimes, as these clog, people opt for surface drainage, adding a splash block, or directing the water a few feet from the foundation.  If your yard is flat, this isn't helping your damp basement.  The roof is collecting large amounts of water and depositing it right where you don't want it- along the basement walls.


Above is a classic example.  The downspout line might have become clogged, so a flex line was installed to divert the water away.  This became disconnected, and now the water just spills against the foundation.

If you do have abandoned underground drains, as indicated by clay or PVC "crocks" with no downspout running into them, your first option is to have these lines cleaned.  This is done by jetting water into them.  I recommend companies that have camera snakes.  They will determine with certainty the condition of these lines.  You can then make an educated decision on how to proceed

I'll continue this discussion in the next blog.

Tuesday, October 11, 2011

Wet Basements Part Two

In my first blog, I talked about wet basements and clay tile foundations.  This time, I'd like to talk a bit about other foundations and problems associated with them.

Older home foundations come in all shapes and sizes.  Among the oldest I see as a home inspector are ones constructed out of field stone, sandstone etc.  These appear to be very roughly stacked.  The "good" side was placed towards the inside.  If you could remove the dirt, the outside would appear to be even more roughly stacked.


.
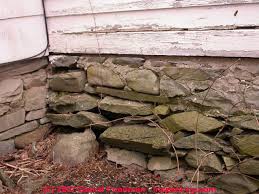
Here's the outside of a very early fieldstone foundation.

These foundations were never meant to keep out water.  For example, on a new home, with either a poured concrete foundation or a concrete block foundation, the exterior will be parged- a sort of stucco like masonry material that is used to seal any voids.  Often you can see this close to the ground on a foundation.  It's only used below grade.  The next step is a sealant material that today is sprayed on- a black tar/paint like material. After that, some builders may install foam insulation boards below grade.  This is optional and debated in some circles.  It does nothing for drainage.

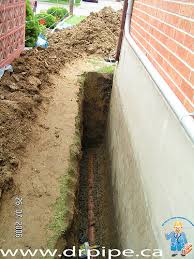
What is sometimes done for drainage is a drainage plane may be installed.  This is a board like material that basically creates a small void between the foundation wall and the soil/gravel backfill.  Any water that makes it to the wall simply runs down via gravity to the footer drains (which we'll discuss next).

The footer drains are what is really carrying water away from your basement.  These are laid on the exterior of the footers, just below the level of the floor slab.  The purpose of them is to collect water that drains down through the soil and towards your basement.  Water will take the path of least resistance.  Footer drains are generally 4" pipe with holes to allow water to enter.  They are then tied into your storm sewer or taken to another termination point on your property, the storm ditch etc.  Gravel is then backfilled to allow easy passage of water towards the drain, and to help eliminate some of the pressures that can occur when soil and clay gets wet, freezes and expands (the result can be a crack to your basement wall!).

The trouble is, if you live in an older house, you probably don't have the current standard of footer drain, parging, or backfill.  For example, the sandstone foundation house probably won't have a footer drain or be parged on the outside.  Homes of this type were typically built in the 1800-1870 period, and a dry basement wasn't a concern.  No mechanical were there, nobody needed a recreation room, there wasn't time for that sort of stuff, so basements were simply used for storing canned goods.  The more cave like, the better.

Later, brick, cinder block, clay tile, concrete block all enter the picture.  With standard sizes, foundations can be built quickly and easily, but they still weren't necessarily worried about seepage.  As the years progressed, it became typical for "drain tile" to be used where we would not use a PVC footer drain pipe, the kind I mentioned earlier.  These tiles were what the name says, simple tiles, fluted on one side, so that if you laid them face to face, you'd have a small gap, roughly 1" to allow water to drain through.

As the name suggests, they were simply tiles, so not connections between them, they were just laid in a row along your footer.  The walls may or may not have been parged, and may or may not have had any type of sealer put on.  That all depends on the decade the home was built.

The photo above shows round clay drain tiles, circa 1950-60's.

With modern construction, after the footer drain is installed, the hole will be backfilled to almost the surface with gravel- just enough dirt on top to plant in.  100 years ago, it's possible no gravel was used.  It wasn't until the 1960's that more than a foot or so of gravel was used.  The amount has grown over the past fifty years to the current standard.

So, you can see, how wet your basement is can be largely dependent on how your home was constructed.  Your expectations for a dry basement have to be tempered to this somewhat, but there are ways to solve these problems.  In  my next blog, we'll begin discussing these methods.

Tuesday, June 21, 2011

Clay tile foundations and wet basements

Here in North East Ohio, many if not most homes have basements.  Something that I often come across in homes built from roughly 1900 through the 1930's are clay tile foundations. 

Traditional foundation materials are stone, brick, concrete block, cinder block, poured concrete, and in many locations clay tile.  In older homes, keeping the basement dry was never intended.  Basements were simply an extension of the footer that was needed in areas were the ground freezes.  By digging below the frost line, around 3 feet, the structure could be made stable and not subject to frost heave that comes with the freeze/thaw cycles.  Dig another few feet and you could stand up and store some items in basements

Over time, building techniques improved, as did our need for space.  Enter the finished basement.  Suddenly we expected that hole in the ground to be dry and comfortable.  In modern construction, this is more easily done through the use of drainage systems and sealed exterior walls.

If you're among those who don't live in a newer home, you might have a clay tile foundation.  This was a structural block made of clay, much like a flower pot.  It can also be compared to a chimney flue.  Typically they have one or two hollow chambers, open on the ends.  Unlike today's more common concrete block, which also has hollow chambers, these would be laid in place with their hollow core horizontally.  They are often fluted, with "grooves" parallel to the hollow chamber.  I've seen flat ones, glazed ones, square ones, they come in many varieties.

Here is an example of a clay tile.  It's been painted white on the outside.  Normally, you won't see the open ends like this.


The pros to the builders were their weight and cost.  The cons to the the homeowner is that they could be considered inherently wet by design.  By having all those horizontally aligned cores, water leaking into your basement at the corner of your foundation can travel the length of the all and appear anywhere, making locating the leaking area difficult. 

In addition, these blocks tend to soak up moisture when it's wet and release it when it's dry.  The trouble is, many people paint over these blocks in an attempt to "water proof" their basement walls.  The paint will fail, and once painted, the cycle of scraping and painting will never cease.

So, now that I've talked about all the trouble with these clay tile blocks, what can you do if you have them in your basement?  If a dry basement is desired, it may never be completely possible, but there are always solutions. 

Before you do anything, make sure your walls are sound.  There should be no large cracks or bowing, which could indicate structural problems.  As home inspectors, when we see things we're not sure of in foundations, we recommend structural engineers to further evaluate the walls.  They will typically charge a fee for their service, and will provide you with written documentation stating the foundation is stable or in need of repair.

Keep in mind that free estimates are usually given when the company evaluating the work also wants the job of repairing it.  If you're not comfortable with the information received, contact another company and compare the information.

I'll continue this discussion in my next blog, talking a bit about the exterior drainage systems used in older homes and going over possible causes of wet basements.  I'll also make suggestions for determining the specific cause of your water trouble and then discussing different types of repairs.